Stable Diffusion
Getting Started
AUTOMATIC1111's WebGUI
https://github.com/AUTOMATIC1111/stable-diffusion-webui
Installation Guide
https://github.com/AUTOMATIC1111/stable-diffusion-webui/wiki/Dependencies
Config แนะนำก่อนเริ่มใช้งาน
เพิ่ม SD VAE และอื่น ๆ ไว้ด้านบน
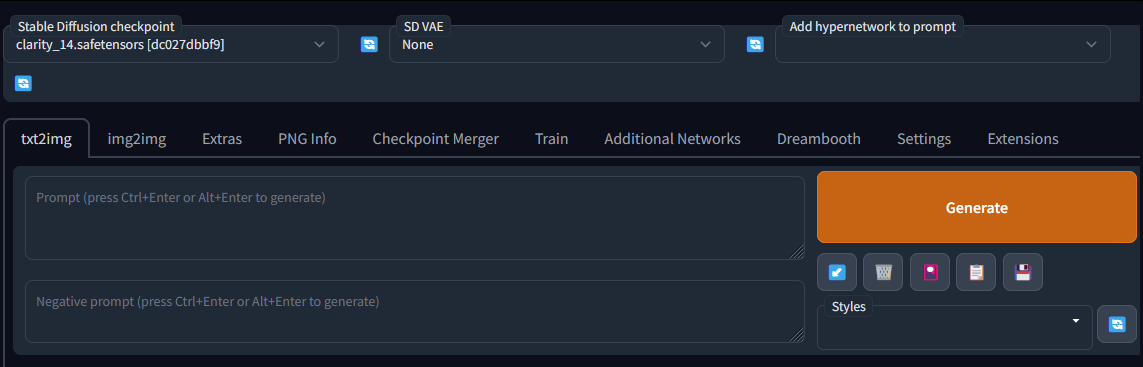
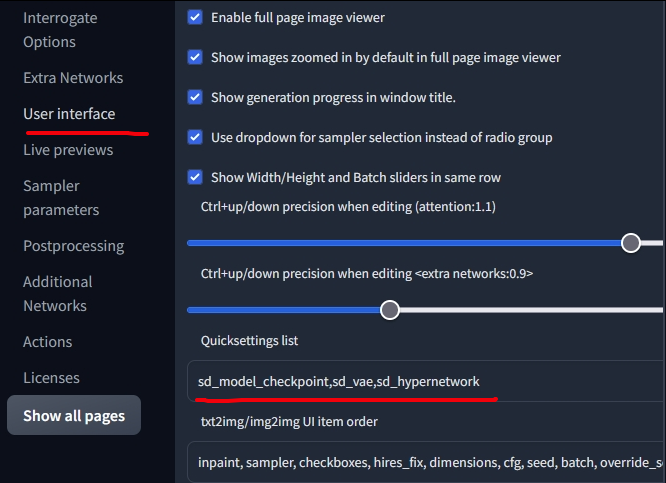
ไปที่ Settings > user interface ดูในส่วน quicksettings list เพิ่ม
sd_model_checkpoint,sd_vae,sd_hypernetworkหรืออื่น ๆ ที่ต้องการใช้ลงไป
Xformers
https://github.com/AUTOMATIC1111/stable-diffusion-webui/wiki/Xformers
Xformers เป็น library ที่ช่วยในการเร่งความเร็วตอน generate ภาพ ใช้ได้กับการ์ดจอฝั่ง NVIDIA พวก Pascal, Turing, Ampere, Lovelace หรือ Hopper
Install xformers
หาไฟล์ launch.py เปิดด้วย notepad
หาคำว่า commandline แล้วใส่ --xformers เพิ่มเข้าไป

เปิดรัน webui-user.bat ได้เลย
ถ้า error เช่น

หมายถึง version PyTorch ไม่ตรง ให้เปิด webui-user.bat แล้วเพิ่มคำสั่ง ลงไปเพือบังคับอัพเดท PyTorch
--reinstall-torch --xformers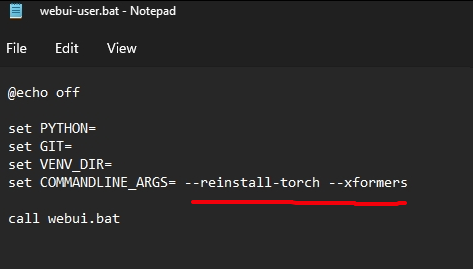
Note
สำหรับเครื่อง vram น้อยเช่น 1660super 6GB
เวลาใช้งานอาจเจอ cuda out of memory ให้เปิดไฟล์ webui-user.bat แล้วเพิ่ม
set PYTORCH_CUDA_ALLOC_CONF=garbage_collection_threshold:0.6,max_split_size_mb:128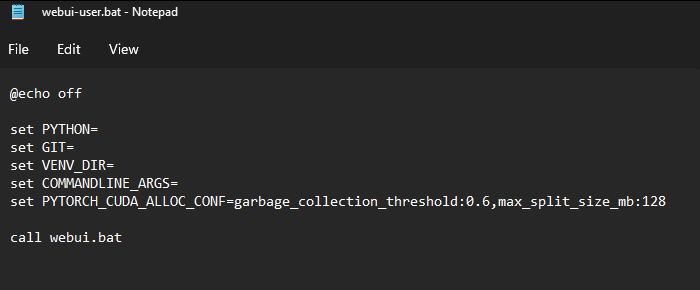
Extension
ทั้งหมดดูได้จากในนี้ ติดตั้งได้ผ่านเมนูในโปรแกรม มีไว้เพื่อช่วยให้ workflow สะดวกขึ้น
https://github.com/AUTOMATIC1111/stable-diffusion-webui/wiki/Extensions
Image Browser
https://github.com/AUTOMATIC1111/stable-diffusion-webui/wiki/Extensions-UI#image-browser
Prompt Gallery
https://github.com/AUTOMATIC1111/stable-diffusion-webui/wiki/Extensions-UI#prompt-gallery
seed travel
https://github.com/AUTOMATIC1111/stable-diffusion-webui/wiki/Extensions-Generation#seed-travel
Kohya-ss Additional Networks
Models
- https://rentry.org/sdmodels
- https://civitai.com
- https://stadio.ai/models
- https://huggingface.co/spaces/sd-concepts-library/stable-diffusion-conceptualizer
- https://www.reddit.com/r/StableDiffusion/comments/xcrm4d/useful_prompt_engineering_tools_and_resources/
Best Practice
สำหรับคนคอมไม่แรง
- เพื่อความเร็วในการ generate ภาพแนะนำให้ปิด Hires. fix ไปเลยในขั้นตอนแรก
- generate ภาพ 512*512 ขึ้นมาก่อนแล้วเลือกที่ชอบเก็บไว้
- โยนภาพที่ชอบลงไปใน PNG Info แล้ว Send to img2img เพื่อนำไปขยาย
- ดูส่วน Script และเลือก SD upscale
- เลือก Upscaler ตามชอบใจ ถ้าไม่ได้ลงอะไรต่างหากแนะนำ SwinIR 4x
- Denoise strength เหลือแถว 0.3
- Upscaler ดูรายละเอียด link ด้านล่าง
Generating a hi res image with hi res fixes, first generates the full image in latent space and then extends that latent representation to a higher resolution through segmentation. This means the latent representation can end up "bent" and therefore while there is no artificating it can look different from the base 512x512.
Lastly, using an upscaler just takes your completed image and passes it through an autoencoder like esrgan that is meant to only increase resolution with no other modifications. Therefore the result is almost 1:1 whatever the lower resolution image is.
In terms of quality. Hi res fix will generate the most natural high resolution image, but if you just want to convert your 512 to 1024 or 4k an upscaler will do it without hassle.
ด้านล่าง คือร่างเฉย ๆ ยังทำไม่เสร็จ
Textual Inversion
GUI
ใช้ build-in
https://book.biribiri.me/books/735b9/page/stable-diffusion-textual-inversion-training
https://github.com/bmaltais/kohya_ss.git
Colab
LoRA
GUI
https://github.com/bmaltais/kohya_ss.git
Colab
https://github.com/cloneofsimo/lora